Monday, November 29, 2010

Deviant Art has a new team on Etsy.

I should probably be asleep by now. But I'm not. Here's a piece I just finished. Found some stock on deviant art by quaddles. I had to do something with the little girl images. They worked nicely with my Tumble Fish Studios images. I added a background by JoesSistah and voila! Took me about 5 minutes. I love it when it alls falls together like that.

© All rights reserve J. Currie 2010
Just a quick note to let Deviant Art members that we have a Team on Etsy! Looks lke it just started up. Check it out.

http://www.etsy.com/teams/6851/deviant-art

For those of you who don't know what Deviant Art is, click the link below to get to the homepage.
http://www.deviantart.com/

This is a huge online site for artists from beginners to pros.

Saturday, November 27, 2010

Christmas Gift Tags

I'm going to take a few minutes out to flog my new gift tags that I'm selling on Etsy. I just finished up some semi-traditional type tags today. What a lot of work. Phew! You can find all three sheets here:
http://www.etsy.com/listing/63113093/traditional-handmade-gift-tags-download

Here they are:
© J. Currie 2010 All right reserved
Here are some Steampunk tags I made:
© J. Currie 2010 All rights reserved.

I also have some free stuff on my Flickr page:
http://www.flickr.com/photos/jody_atcs/sets/72157624359089627/

Thanks for looking.

Friday, November 26, 2010

And the winner is:

The winner for the first draw is B-Jo.  So this draw was for a collection of rubber stamps. Congratulations!!!

Next week's draw is for an envie of emphera. Stay tuned.

Thursday, November 25, 2010

Neurons and Layer Masks

Some times it's easy to become complacent. An example is the person who feels that after high school you shouldn't have to learn anything. But learning is healthy for your brain. The brain can grow more brain cells. It creates more neurons.

I sometimes become  complacent. That's when I start doing the same techniques that I know over and over.  This has been the case lately.

So I search for tutorials and ask questions, eventually learning something new. This time I learned something new that I should have learned a long time ago; working with layer masks. I'll tell you the terrible truth, "It's super easy".

Let me explain:
Open a graphic or finished piece. This will be your background layer.

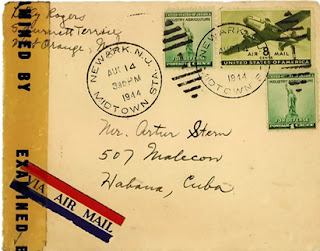
Envelope courtesy of:
http://www.flickr.com/photos/digitalcollagestudio/4636531507/in/photostream/

Next PLACE a layer mask. This will be Layer 1.
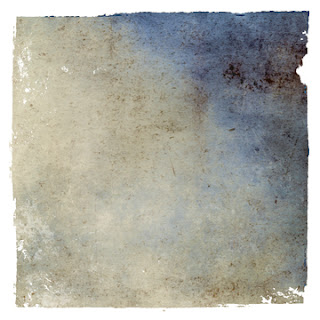
Shawhouse Creations
Then use the drop down menu in the LAYERS pallete to select SCREEN.
You will then have an ugly, washed out picture like this one.

But look carefully and you will see the ragged and torn edges from the mask  appear on the envelope (that's a good thing). So then go up to ENHANCE menu and find ADJUST LIGHT. You can play around with that and with the ADJUST COLOUR under the same menu.

Then it will look more like this.
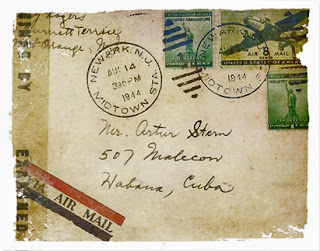
©NeonSun 2010
 

For another tutorial on the subject check out this link.
http://www.flickr.com/photos/skeletalmess/4537941043/sizes/o/

Or you could print out the original and let your cat chew on it for awhile. The choice is yours.
Your brain thanks you for reading this post.

Friday, November 19, 2010

Everyone Likes Prizes

FOLLOW ME AND WIN!!! 
See top of sidebar to become a follower.

Okay. There are a few people that became followers to be entered into the giveaway. There are no prizes for lurkers, so sign up for your chance to win! The followers widget is at the top of the sidebar.

Winners will be sent out on the Friday of each week.

- The first prize will be a small box of assorted rubber stamps.
It will be awarded on November 26.

- Second prize will be an evelope of awesome goodness. That will be awarded on December 6. 

- Third prize will be either a collage from my Etsy site.
http://www.etsy.com/shop/NeonSun
or 3 sheets of downloadable ATC Backgrounds (instant gratification)
Date this will be drawn is December 10.

This is a lot of fun for me trying to find cool stuff for you.
Tell all your friends.
Good Luck
© NeonSun Studios. All rights reserved 2010 J. Currie
paris turquoise background:

Sunday, November 14, 2010

YAHOO!!  2000 Views!!!!

2008 views from 24 countries.

Countdown to 2000 hits on my blog!

I can't believe I will have 2000 hits on blog soon!
At 1000 we had virtual cake and fireworks. This time I'm going to do a giveaway.

Sign up to FOLLOW ME & WIN! on the right hand sidebar.  Don't forget to add your comments on what you would like the giveaway to be.
Choose one of the following:

- A large envie full of emphera

- Rubberstamps, including a Paul Gauguin rubberstamp from the Musee de Orsay and one large Teesha Moore rubberstamp.

- A frameable print of your choice from my blog or a print of my choice from my Etsy Store
  http://www.etsy.com/shop/NeonSun

Leave comments and suggestions on what you would like to see as My Great 2000 hit Giveaway!

All current followers are automatically entered.
This is an international giveaway so if you are in Bangalote, Katmandu,  Montana, Amsterdam or Winnipeg sign up because you can win!!!

Thursday, November 11, 2010

More on Brushes


I've had a request to write more on brushes.
I have moved my TAG Cloud from the bottom of the page to the top to make it easier to search my blog.
Here are some links on this blog about brushes:

 http://neonsunshine-jody.blogspot.com/search/label/brushes
http://neonsunshine-jody.blogspot.com/search/label/brusheezy
http://neonsunshine-jody.blogspot.com/search/label/steampunk%20brush

To start off here's a link from Deviant Art that I posted earlier:

http://nokari.deviantart.com/art/Guide-to-PS-Brushes-66462868

This is a small downloadable handbook which contains a lot of useful information about PSE/PS brushes.
There are a couple of different types of brushes. The default set of brushes are for drawing.    Then there are stamp type brushes. The stamp brushes reside in the same place as the regular brushes. To change the colour of your brushes. Go to the bottom lefthand corner of your toolbox. Click on foreground colour; that will be the colour of your brush.


Black brush using the BRUSH menu

Red brush using BRUSH menu and selecting RED foreground colour

You can also reach them using the STAMP TOOL. A word of warning about using brushes with the stamp too. At the top near the brush menu is the pattern tool. When you select a brush it will also have the colour and PATTERN that is selected. So you cannot choose the colour for your brush stamp On the brighter side there are some great patterns that can be used with your brush.


-  When selecting a brush you'll see a number below it. That's the MAXIMUM size of the brush. The absolute maximum of any brush is 2500 x 2500 px or just over 8". That's why when you use a new brush for the first time it may be huge enough to cover your screen. That number is also important when you are deciding the size of your finished artwork.

Also on my sidebar there are links to sites that offer free brushes. These are grouped together so you don't have to pick through the links. Most people on deviant art or brusheezy will post their new brushes to get feedback and find out how popular their brushes are.

Where to get brushes:

http://shadowhousecreations.blogspot.com/search/label/Brushes

http://www.deviantart.com/

http://www.brusheezy.com/

The last point to remember is anyone can make a brush from any image. If you want to make a brush of your cat you can do it.  Here's a video that explains how to do it.


This video is about how to save your new brush.


I hope these tips help. You may have noticed I've included a lot of  links in my post. The reason for this is that I'm not very good with brushes yet. So I thought I'd let direct you to other people that are more knowlegable. After all this blog is about learning photoshop with me. So in the spirit of that, feel free to send along your own tips and links which I will publish.


Sunday, November 7, 2010

Colour Pop

So I was looking at a swanky furniture catalog recently. The furniture was placed in a loft with concrete floors. The photo was black and white, while the furniture was coloured (of course). I've been wanting to learn how to do a colour pop for awhile. So I checked out this site:
http://www.youtube.com/profile?user=PhotoGavin#p/u/9/OcRbEwUQcb0
I have him listed in 'Blogs I follow' on my sidebar.

So, there you have it, an easy colour pop. Have fun.


ShareThis

Related Posts Plugin for WordPress, Blogger...