Okay, it's been awhile since my last post. But I haven't forgotton you. I'm happy to say that I've had 20,000 views on my blog since I started this blog according to Google. I've just jumped from using PSE 6 to using PSE 11. This is one upgrade that's actually worth the money. If you wish you could use 'Actions', PSE has finally included that option. If the tools look different, it's because I'm doing this tutorial using the Elements 11 work space.
So I've just found a super easy way to change colour. You don't need PSE 11 to do this. First click on the element you want to highlight. I add each element (flower) on a new layer. If you do that too, then you can just click on the layer you want to colour. Otherwise, you can probably select with the selection tool. Once the part you want to colour is selected then you can:
Go to your ENHANCE menu and drag down ADJUST COLOUR. Then ADJUST HUE/SATURATION.
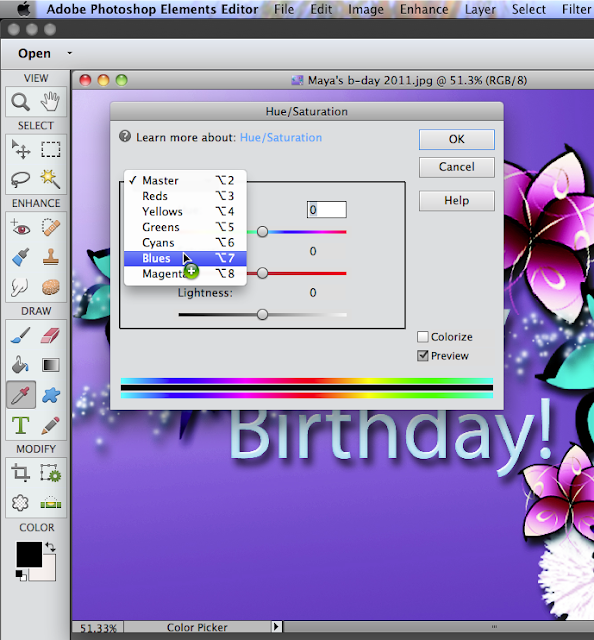
Now here's where it gets interesting. A window will open that looks like the one below. There is a pull down menu button called MASTER. You'll notice that when you pull down the menu, MASTER will now be at the top of the menu instead of being a button.
MASTER is the one you choose if you want to change the colour of the Entire picture.
Instead choose a colour like blue, in this instance. Then, start to play with the sliders. You will notice that anything blue in the flower you selected will start to change colour as you slide back and forth.
This is a way to isolate one colour only, and change it without changing any of the other colours in your picture.
Unfortunately I'm not that well organized tonight. I don't have a PSD of this picture. I'll have to use another picture to show you some samples.
This is the original composition I did. I clicked on the red poppy layer to highlight them. Then I pulled down the the menu on HUE/SATURATION. Then I chose RED.
I then adjusted the sliders until I got a green colour and played around with the SATURATION slider and the LIGHTNESS slider.
On the dragonfly, I went through the same steps.
One thing to remember is that the colour will mix with the original colour like poster paint. Remember your colour mixing. Red and blue make purple, so if you have red, drag the slider to blue to make purple.
Have fun and keep creating!
If you have any questions then make a comment so we can all see the answer. If you're thinking it, there are probably a lot of others wondering as well.


