Hey!
I just took a look at my visitor list. I'm totally amazed at all the countries you come from! I had no idea that there were so many different countries. But thanks for checking out my blog.
Sad news in the world of Photoshop. I know this is old news from the spring, but I thought that I would mention it here. The new extended versions of Photoshop will only be released through subscription. You can no longer buy new versions in the box. Here's a link with some more info:
http://shadowhousecreations.blogspot.ca/
Then for the rest of us peasants is the new Photoshop Elements 12. At least we still have some options. Elements has always served me well so I will stay with my Elements 11.
If you are totally broke then there's always good old GIMP which you can download here for free:
http://www.gimp.org/
Also SUMO PAINT remains free; but if you want it on your desktop then you can buy it for $20.
http://www.sumopaint.com/app/
These are all in my links list on the right hand column.
Speaking of links, I just went through and deleted pages and sites that are no longer with us. A moment of silence for all the dead blogs please.
I fixed all the broken links. Some of the banners have been deleted. Once again, a moment of silence. I will be adding some new links in the near future.
I did add a link to Weebly which is totally FREE website host. I searched long and hard for a FREE website host that offers a store option at no cost and Weebly fit the bill. It offers an easy drag and drop store builder.
If your blog was deleted or if your badge was deleted, please send me a link to your badge with code and I'll put it back up.
If you have any ideas for great links post it here and I'll check it out. Most of my links here are for Photoshop. Other than that I have 2 requirements for links.
1 - That it's free or at a nominal cost.
2 - That it works well. Nobody likes crap that doesn't work even if it is free.
I've added a link to Shabby Blogs which features some great Blog eye candy for Free.
That's about it for now. I just wanted to update everyone on what's going on here.
Keep creating because every famous artist started somewhere, so keep doing what you love.
Monday, September 30, 2013
Saturday, July 27, 2013
Adding Patterns
Hi. Here's a simple way to add a pattern fill to something using the Colour Pop.
 |
| Photo courtesy of Retro Cafe Art |
Once you have your photo up, you can SELECT the QUICK SELECTION TOOL. Elements 6 users, this is in your magic wand flyout selection. Elements 11, you'll find this at the bottom left side below your workspace.
Make friends with this area, we'll be using it a lot. Here's a better pic. of it.
 | ||
| Notice that the quick selection tool is chosen. |
After choosing the QUICK SELECTION TOOL you'll notice your cursor turns into a circle. Start at the top of the area you want to fill and drag down to the bottom and release.
There should be marching ants around your selection.
It's probably not perfect. If it doesn't go out to the edges you can drag the marching ant line out. I like to increase the size of the photo when I'm dragging the line out. Even if you don't need new glasses you'll find resizing helpful.
At this point you may of dragged the marching ant line way out of your selection area. Don't stress out. you can fix this. Hold down the OPTION (ALT key for PCs) key and it will now be able to pull the line back inside the border.
Then click on your PAINT BUCKET tool.
 |
| Above picture |
At the bottom of your screen will be all your options for the PAINT BUCKET tool. At the far left you have 2 different boxes. The plain box is plain colour. Okay, dump in some plain colour if it makes you happy. Now you can remove the plain colour by hitting Command Z.
The second box has diagonal lines. It selects PATTERNS. Next to it is the pattern I've selected.
Go to LAYER -> NEW FILL LAYER -> PATTERN
Okay, now dump the PATTERN into the selected area (marching ants). Mine looks like this.
 |
| So Tragic... |
I agree; it doesn't look that great. Take a moment to look at the sliders in the above picture.
In this tragic picture:
The MODE is NORMAL
The TOLERANCE is at max
The OPACITY is at 100%
Click on your new FILL LAYER layer on the right hand side of your page where your LAYERS pallet lives. You can:
Adjust your MODE (try using MULTIPLY or LINEAR BURN)
Adjust your OPACITY to around 75.
Your fill should look like this.
NOTE: If you added colour go to the MODE pull down menu and second from the bottom is COLOR. The jacket should fit then.
 |
| Linear Burn at 75% opacity |
For most people this is the last step. However the jacket is really dark, MULTIPLY often is. In this case go to the top and under ENHANCE pull down the menu and go to ADJUST LIGHTING and LEVELS. You can adjust the lighting without the fade that you would get from the OPACITY slider.
I used this method and about a zillion more changes to make this.
 | |
| Notice the jacket. Thanks to Fruebel for the balloon and Jinxmim for the colourful bird. |
Monday, February 25, 2013
Everyone loves a Freebie!
Here's a few freebie backgrounds. Show me what you've done and I'll post it here.
 |
| 300 DPI - 8 x 10 |
 |
| 300 DPI - 4 x 4 |
 |
| 300 DPI - 8 x 10 |
 |
| 300 DPI - 2.50" x 3.50" |
 |
| 300 DPI - 2.50" x 3.50" |
Sunday, January 20, 2013
F**K the Preset Manager
As mentioned earlier, I just got PSE 11. For years I collected brushes, .abr and Patterns, .pat. I have hundreds of them. My greatest fear in moving from PSE6 to PSE 11 is losing them. I had the worst time adding them in the first place. I watched YouTube videos and searched the forums and groups.
It didn't matter what I tried; trying to add them drove me crazy. Sometimes I got lucky after hours of trying. Suffice to say, I paid for those brushes with hours of anguish.
Now I have to move those hundreds of items into PSE 11. I've been there before and it was ugly, so I've avoided doing it. After repeating my earlier mistakes and getting frustrated again I thought there has got to be an easier way.
I'm here to tell you there is!
All you have to do is go to your old photoshop program and double click on the icon. Then click on PRESETS. Next, you can click on BRUSHES. You will see a whole folder of .abr files (Brush files)
 |
| Brush file |
To make the next steps easier, you can change from icon view to list view.
-SELECT ALL (the brushes)
- Cut
Open up your PSE program and head to the brush section there.
- PASTE into PSE 11's brush folder.
And that's it. You're done.
There will be doubles and you will be asked if you want to replace the brushes that are doubles. Just say no.
Your patterns, styles and textures can probably all be done in the same way.
Friday, December 21, 2012
Easy, Peasy Colour Replacement
Okay, it's been awhile since my last post. But I haven't forgotton you. I'm happy to say that I've had 20,000 views on my blog since I started this blog according to Google. I've just jumped from using PSE 6 to using PSE 11. This is one upgrade that's actually worth the money. If you wish you could use 'Actions', PSE has finally included that option. If the tools look different, it's because I'm doing this tutorial using the Elements 11 work space.
So I've just found a super easy way to change colour. You don't need PSE 11 to do this. First click on the element you want to highlight. I add each element (flower) on a new layer. If you do that too, then you can just click on the layer you want to colour. Otherwise, you can probably select with the selection tool. Once the part you want to colour is selected then you can:
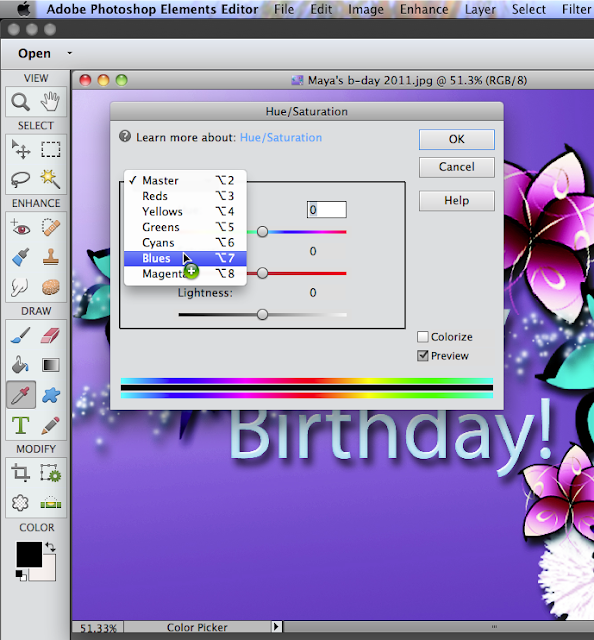
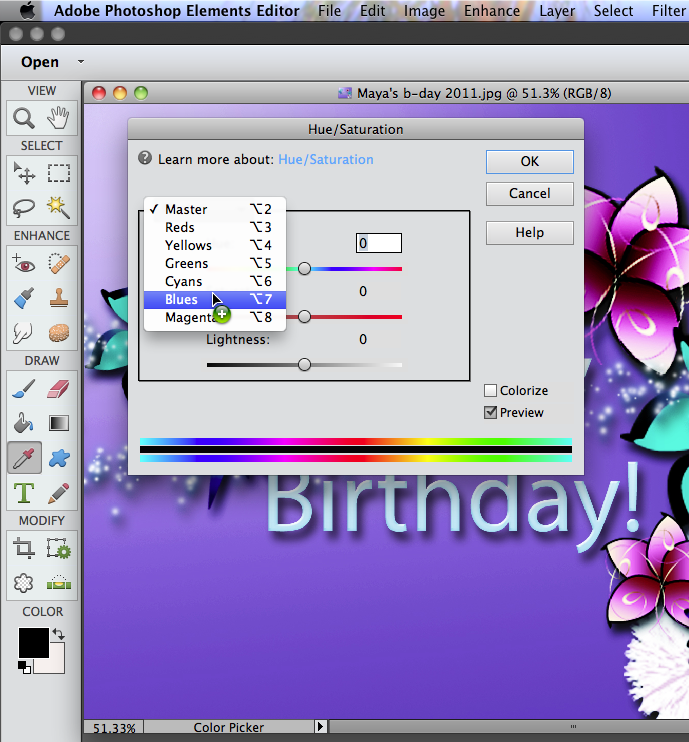
Go to your ENHANCE menu and drag down ADJUST COLOUR. Then ADJUST HUE/SATURATION.

Now here's where it gets interesting. A window will open that looks like the one below. There is a pull down menu button called MASTER. You'll notice that when you pull down the menu, MASTER will now be at the top of the menu instead of being a button.
MASTER is the one you choose if you want to change the colour of the Entire picture.
Instead choose a colour like blue, in this instance. Then, start to play with the sliders. You will notice that anything blue in the flower you selected will start to change colour as you slide back and forth.
This is a way to isolate one colour only, and change it without changing any of the other colours in your picture.
Unfortunately I'm not that well organized tonight. I don't have a PSD of this picture. I'll have to use another picture to show you some samples.
 This is the original composition I did. I clicked on the red poppy layer to highlight them. Then I pulled down the the menu on HUE/SATURATION. Then I chose RED.

I then adjusted the sliders until I got a green colour and played around with the SATURATION slider and the LIGHTNESS slider.
On the dragonfly, I went through the same steps.
One thing to remember is that the colour will mix with the original colour like poster paint. Remember your colour mixing. Red and blue make purple, so if you have red, drag the slider to blue to make purple.
Have fun and keep creating!
If you have any questions then make a comment so we can all see the answer. If you're thinking it, there are probably a lot of others wondering as well.
Okay, it's been awhile since my last post. But I haven't forgotton you. I'm happy to say that I've had 20,000 views on my blog since I started this blog according to Google. I've just jumped from using PSE 6 to using PSE 11. This is one upgrade that's actually worth the money. If you wish you could use 'Actions', PSE has finally included that option. If the tools look different, it's because I'm doing this tutorial using the Elements 11 work space.
So I've just found a super easy way to change colour. You don't need PSE 11 to do this. First click on the element you want to highlight. I add each element (flower) on a new layer. If you do that too, then you can just click on the layer you want to colour. Otherwise, you can probably select with the selection tool. Once the part you want to colour is selected then you can:
Go to your ENHANCE menu and drag down ADJUST COLOUR. Then ADJUST HUE/SATURATION.

Now here's where it gets interesting. A window will open that looks like the one below. There is a pull down menu button called MASTER. You'll notice that when you pull down the menu, MASTER will now be at the top of the menu instead of being a button.
MASTER is the one you choose if you want to change the colour of the Entire picture.
Instead choose a colour like blue, in this instance. Then, start to play with the sliders. You will notice that anything blue in the flower you selected will start to change colour as you slide back and forth.
This is a way to isolate one colour only, and change it without changing any of the other colours in your picture.
Unfortunately I'm not that well organized tonight. I don't have a PSD of this picture. I'll have to use another picture to show you some samples.


I then adjusted the sliders until I got a green colour and played around with the SATURATION slider and the LIGHTNESS slider.
On the dragonfly, I went through the same steps.
One thing to remember is that the colour will mix with the original colour like poster paint. Remember your colour mixing. Red and blue make purple, so if you have red, drag the slider to blue to make purple.
Have fun and keep creating!
If you have any questions then make a comment so we can all see the answer. If you're thinking it, there are probably a lot of others wondering as well.
Tuesday, August 7, 2012
Photoshop for The Terrified
Tonight a Facebook friend asked me how to get started on Photoshop. I've been there. I opened the program and it just sat there, staring blankly at me. I'm not ashamed to say that I gave up; a few times. So here's some info about how to get started.
Double-click on your photoshop icon. When your program is open there will be panels to the right that look like this.

Below that are your PANES. The first is the Content pane, then the Effects pane. Below the Effects pane is the Navigator pane.
Open it by clicking on the triangle. These triangles are for opening and closing the PANES. When you open it there won't be much there. Also your Layers pane and your Favourites pane will drop down to the bottom of the panel. That's alright.
Now we will open a new BLANK FILE. Here's a screenshot.

Remember, the triangles are for opening and closing.
First name your document.
PRESET is the size of paper. You can select U.S. paper for a standard paper size or photo size; whatever you want. If you want a specific size, then select Custom from that same menu. Below are the width and height boxes. To the right are pull down menus where you can choose the type of measurement you are comfortable with.
Below those is the RESOLUTION. I use 300 pixels/inch. It's standard.
Below that is the COLOUR MODE. RGB colour is fine. That means it will print out the colour that you see you picture on the computer screen.
Below that is BACKGROUND CONTENTS. That is the colour of the background. The best choice is Transparent. That's because later when you use the eraser a background colour will appear. If you erase on a red background when you erase the red will show. With transparent you have a clear background, so when you erase, what you are trying to erase will gone. This will save you endless amounts of misery later on when you want to make a png.
In the bottom right of this box the IMAGE SIZE will appear. Now you're ready to click OK. Your page will appear and to your right your NAVIGATOR will have a thumbnail of your page. this is what it should look like.

Now we are cooking! Notice below your navigator pane there is a LAYERS pane or pallette. Click on it to open it up.Here's what you'll see.

You will notice 2 things: your navigator pane gets smaller and there are a bunch of scary looking things at the top of your LAYERS pane.
First we'll deal with making the navigator pane larger. Where my pointer is there is a handle that you can grab onto. If you slowly move your pointer, the pointer will change. Press down on your mouse. That will enable you to slide the pane up and down making the panes larger or smaller. I like to give more space to the layers pallette because as you add more layers, you'll need more space. I find with the navigator pane I mostly use the slider.
Now let's check out the navigator pane. Top left will be left on normal. It has a pull down menu and when we get a graphic on the page you can try the others.
Next is Opacity. Leave it at 100% for now.
DON"T SKIP OVER THIS.
Okay, this is a good time to talk about what the layers pallette is all about. This pane is the basics of how Photoshop works. Grab a few sheets of coloured paper. Put one piece of paper on your desk. This is your background. Remember the transparent background we made? Next put another sheet on top, or better still if you have a sticker or other graphic lay it on top. This is your second layer. If you do any kind of collage this will start to be familiar. Next element. This is layer three.
So, what you are doing is building a picture from the ground up. You can move these layers up and down and add adjustment layers with effects.
Below are icons. The first one is to add a layer. Go ahead and add a layer by clicking on the icon. Notice that your first layer is called layer 2. Add another layer. This is layer 3. You can change the order of layers by dragging them to the top or the bottom. To the right of those thumbnails are names layer 1, layer 2, etc. Double-click on that name and you can change the name of the layer. Hit RETURN on your keyboard. Done! You just named your layer.
Next is the circle icon. That's to add the adjustment layer I was talking about. Go ahead and click on it. Holy Crap! What happened? Don't panic. Here's what you will see.

Notice where my pointer is. There are 2 squares. The top one is red. The one in the background is white. The red one is Foreground colour and the white one is the background colour. Remember when we chose the background colour? If the colour of the background was turquoise that's what you'd be looking at when you open your page. So if you're wondering why your new file is was turquoise, now you know.
Just click cancel to get rid of the colour. If you clicked OK on the colour box you'll be happy to hear our next icon is to delete a layer. Simply click on the coloured layer and hit the delete icon.
One last note about the layers pallette. You have probably noticed the eyes next to the boxes. If you add a layer and then aren't sure you want to keep it, then click on the eye to make that layer invisible. Layers can be manipulated and worked on using transparency or using effects on the layers pallette. Remember the NORMAL setting on the pallette. Often you can invest a lot of time manipulating the layer. This is when the eye comes in handy. You can turn it off instead of deleting it.
Okay, so you are probably bored to tears by this point and you are itching to make something.
Let's do a quick and dirty (just a term, this is family friendly site) picture with what you have learned. Don't close anything!
Delete all the layers until you are back to layer 1.
Go here and select a background of your choice.
http://graphicsfairy.blogspot.ca/p/search.html
In Photoshop go to FILE->PLACE to place your graphic. Adjust the size by clicking on it and grabbing the corners. Here's mine.

Next click on new layer in the layers pallette for your next layer. The beauty of putting each new element on a separate layer is it's easy to get rid of if you change your mind later.
Next layer add a new element and choose MULTIPLY on layers pallette. Adjust Opacity with the Opacity slider.

Add another layer.This is your texture.
Play around using opacity and effects.

This is our last layer. Go to layer->Flatten image
Go to FILE->Save
Say goodnight Gracie.
Good Luck!
Wednesday, April 25, 2012
ACK!
In my absence Blogger has changed everything! So, I have to sort through everything and update to the radically different interface. But not tonight.
Just an update.
I had my appendix removed recently, so I haven't done anything for awhile. I just updated my Etsy shoppe. I've also started bookbinding. I shall return to my photoshop adventures soon, as I'm now able to spend longer periods of time in my computer chair.
I added a new website Kim Klassen Cafe, that looks intriguing and I will return shortly.
I've had about 700 views in my absence and I thank you for hanging in there.
Just an update.
I added a new website Kim Klassen Cafe, that looks intriguing and I will return shortly.
I've had about 700 views in my absence and I thank you for hanging in there.
 |
| My latest bound book. |
Monday, March 5, 2012
Actions in PSE; It Can be Done
Go to any Adobe forum and you will be told that you can't run actions in PSE. But you can through the EFFECTS pallette. For those of you that don't know what actions are:
ACTION - A series of steps used to alter a photo. You double-click the action and watch it run.
Here are some links to get you started. Just try adding one or two to start with. Also make sure they are made for PSE. If they are not made for PSE there will be commands in the action that Elements doesn't have so Elements cannot do the actions.
Here's the links:
http://www.thecoffeeshopblog.com/p/loading-actions-into-photoshop-elements.html
It tells you to put the database in the garbage. It's alright, if things go terribly wrong you can take the database out of the garbage and go for a walk to calm down.
Here are some PSE friendly Actions from the same site.
http://www.thecoffeeshopblog.com/p/coffeeshop-actions-and-presets.html
Here is a video if you prefer.
http://www.viddler.com/v/7ea7b063
They have some free actions, but you have to sign up to get them.
More useful info on PSE Actions.
http://graphicssoft.about.com/od/pselements/qt/actions.htm
Have fun. Hope this works for you. Leave a comment to let me know. Or you can send a small jpg of what you made with the actions and I'll post it here.
Just to let you know comments are moderated and I don't open anonymous comments as they are usually always spam.
ACTION - A series of steps used to alter a photo. You double-click the action and watch it run.
Here's an example of a picture that has had some actions run on it.
 | ||
| original Thanks to PPS DigiScrap |
 | |
| With Actions |
Here are some links to get you started. Just try adding one or two to start with. Also make sure they are made for PSE. If they are not made for PSE there will be commands in the action that Elements doesn't have so Elements cannot do the actions.
Here's the links:
http://www.thecoffeeshopblog.com/p/loading-actions-into-photoshop-elements.html
It tells you to put the database in the garbage. It's alright, if things go terribly wrong you can take the database out of the garbage and go for a walk to calm down.
Here are some PSE friendly Actions from the same site.
http://www.thecoffeeshopblog.com/p/coffeeshop-actions-and-presets.html
Here is a video if you prefer.
http://www.viddler.com/v/7ea7b063
They have some free actions, but you have to sign up to get them.
More useful info on PSE Actions.
http://graphicssoft.about.com/od/pselements/qt/actions.htm
Have fun. Hope this works for you. Leave a comment to let me know. Or you can send a small jpg of what you made with the actions and I'll post it here.
Just to let you know comments are moderated and I don't open anonymous comments as they are usually always spam.
Saturday, February 11, 2012


Subscribe to:
Posts (Atom)
